You have to agree that swimming pool pumps can have leaking problems after a certain period. This situation arises when the pump becomes defective due to various leakage problems.
While detecting the type of leakage is an issue in its own accord, yet you can still choose to replace the pump seal to clear the defects present in the pump.
Finally, you can relax with this burden of leakage and unexpected damage to your swimming pool pump by using this post. This guide offers a universal technique, as most swimming pool seal parts are the same in centrifugal pumps.
To help you out, this How to Replace a Swimming Pool Pump Seal guide has been prepared solely to demonstrate the right way of removing and replacing the pump seal when there is a defect.
You will not have to look for other sources as this guide covers all the possible instances for replacing the seal.
Table of Contents
Steps to replace a swimming pool pump seal
Step 1 – Remove the pump’s housing
- When you look inside a swimming pool motor pump, you will find that usually, the motor plate holds the pump housing in place with the help of a metal ring clamp or a couple of bolts and nuts. Thus, your first step is to remove the pump housing from the metal plate.
- Use a crescent or socket wrench to unscrew the bolt linked to the clamp or remove the set of bolts and nuts, whichever is applicable. You may occasionally witness a hand knob in various banded pumps that hold the clamp in place of a nut.
- Apply some force to slide the pump assembly back including the attached motor. Make sure that you place the slid pump on a convenient place to work upon it.
- Here, you can either let the electrical conduit stay in place while you start with the replacement procedure or you can disconnect its wires from the motor component to allow you more space to work.
- Keep the power off while performing any of the above steps and remember the way you detached the wiring as you must reattach it precisely as it was.
Step 2 – Bring out the Impeller
- Carefully remove the impeller cover’s screws, and remove the diffuser (impeller cover) from the impeller.
- Make sure to keep all the screws stacked in a safe place so that you do not lose them when reassembling the unit.
Step 3 – Inspection
- Once the shield cover is removed, it is time to check for damages to the impeller, if any. In fact, most injuries to the pool pump happen on the impeller, so it is prudent that you inspect for the damages.
- Besides, if the impeller is the one that is damaged, then you may not have to go through the headache of opening the pump in later stages.
- Look for damage signs such as melting due to heat, or cavities in the impeller due to damaged fins.
- You must replace the impeller unit if the damage is noticeable.
Step 4 – Removing the Impeller
- To remove the impeller for replacement, you need first to stop the shaft motor so that it does not turn while you continue with the removal process. You will have to set the impeller in a counter-clockwise direction to take it out.
- Beware to avoid using vice grips to hold the motor shaft while removing the impeller. A better way is to first remove the core motor’s cap on the other side of its axis. Prefer a suitable wrench or screwdriver to hold the rod from rotating while you unscrew the impeller.
Step 5 – Taking out the seal plate
- Now, it is time to remove the pump’s seal plate from its motor so that you can reach its shaft. Generally, you will find four bolts that keep the seal plate intact with the engine.
- This step only works when you remove the impeller unit from the pump, which you can learn about in the previous step.
Step 6 – Extract the old seal unit of the pump
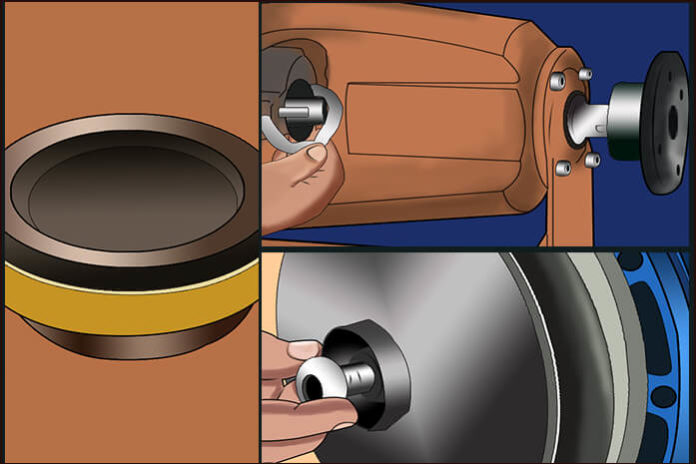
- Once the seal plate is removed by unscrewing the bolts, it is time to remove the seal unit. With the help of channel locks, you have to carefully remove the old spring pump seal from the shaft of the motor.
- You will notice a ceramic portion inside the seal plate’s core. Avoid damaging the plastic material of the plate at all costs. A prudent option is to push it out from the behind with the help of a screwdriver.
- Also, use the screwdriver to remove the used ceramic-based seal. Make sure to remove the rubber varshal with the ceramic seal.
Step 7 – Cleaning and replacing of the seal
- Use a clean and dry cloth to wipe the shaft of the motor and the plate of the seal gently. Also, check for any melting portions, cracks, and other damages on the plate. This task is necessary to avoid leakages in the future, even on replacement of the seal.
- Also, check the impeller for breaks or cracks.
Step 8 – Installation of the new assembly
- Before installation, you should keep in mind to avoid touching the ceramic seal with a greasy or metallic unit as it can damage its purity.
- Gently push the seal’s ceramic portion into the plate of the seal. Do this with clean hands. Keep the rubber varshal part towards the plate and the ceramic side facing opposite to the motor.
- Then, push the seal spring portion over the shaft of the motor. Slide it gently along the threads. The spring’s black-carbon side should attach to the ceramic’s white side.
- Avoid lubricating the seal with any other fluid, except water. Lubricating with other lubes will end up overheating and damaging the impeller due to excessive slipperiness.
Step 9 – Reassembling the impeller assembly
- Now, it is time to replace the impeller back in its place. Use a wrench to hold the motor shaft in place so that it does not rotate.
- Start screwing the impeller in its initial position. You may have to keep the equipment stable at its position firmly while doing this.
- There should be an experience of tightness due to the pump motor’s rotation while screwing.
Step 9 (a) – Reassembling the impeller plate
- Next, you have to align the impeller plate back over the unit and tighten its bolts. Monitor that the plate does not come in direct contact with the impeller beneath it. You can test this by rotating the assembly with your hand.
Step 10 – Reassembling the motor and pump
- Before replacing the pump seal plate, check for damages or cracks in it. If it has been stretched out or flattened, you may have to replace it.
- If not, then move on to check that the plate clamp covers the rim on the outside from both sides of the housing and plate. It can be troublesome to achieve this step sometimes, but if you do it carefully, then it should work out.
- Use a socket or wrench to tighten the band. Or, if you have a hand knob in your pump, then use that to tighten it. You can also use a wrench to tighten the bolts and nuts on the unit to reassemble it.
Final Thoughts
Hope this guide helped you achieve the replacement task of the pump seal successfully. Remember that the key to success here is by monitoring each assembly unit for damages so that you do not have to disassemble the unit completely for replacing a part.
Sometimes, the issue is on the front layers of the pump, which you can comfortably handle. Also, remember to perform this operation of How to Replace a Swimming Pool Pump Seal with clean hands to avoid damaging the unit.


